Alcatel Smartwatch that works with both Android and iOS

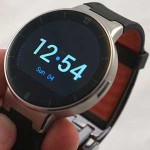
Alcatel revealed its new smartwatch that will work on Android and iOS devices. Of course they have their own OS on the watch to allow it to work on both platforms as opposed to Android Wear and iOS limitations. Other than the very basic Pebble brand of smartwatches this is the only one that allows you to use it cross platform which sets it apart from other smartwatches.

Alcatel Smartwatch designIn almost the same way as Android Wear does the Alcatel Watch is maintained via a companion app available in the Google Play Store and Apple App Store. From the Alcatel smartwatch app you can do things like choosing what apps send the watch notifications, setup health data management, change the watches color schemes and themes, and other management options for your watch. You will notice however that there are few limitations when syncing the Alcatel Smartwatch to an Android device due to its open OS although with iOS devices there are limitations currently. The watch will work with iOS native apps like the dialer and mail apps although third party support is not currently available. This is something that may get tweaked in the future to allow third party iOS app notifications through the watch.

Alcatel Smartwatch Design
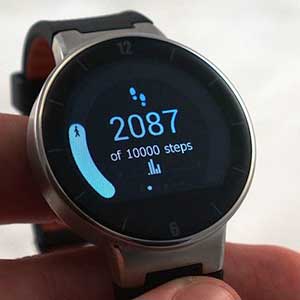
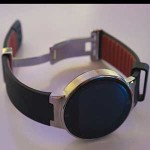
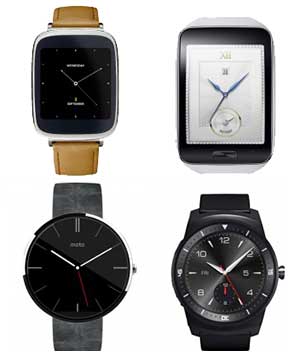
There are going to be four versions of the watch available although the two “micro-textured resin models will be available in March but the two metal options aren’t expected to be available until the end of the year. The micro-textured resin versions will come in three different colors including black, red and white. The design almost completely mimics the Moto 360 with a slightly smaller screen and is much lighter. There is a small hidden micro USB charging port allowing you to use the cables you already have for your phone if using Android without a special charger. In my opinion this is great because you can charge it anywhere without carrying around yet another charger.

Alcatel Smartwatch Interface
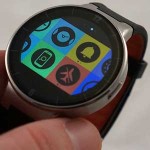
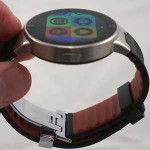
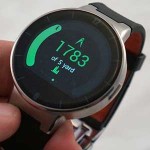
The watch itself is not controlled by swiping like other smartwatches on the market. You need to tap the bottom edge of the watch to control it. As with Android Wear when you raise your wrist the watch screen will activate so you can start using it. You can tap on the screen to switch between the watch face and menu that looks a bit more like Windows than the other 2 OS’s. While useable everyone we have heard from say its a bit sluggish compared to Android Wear.

Smartwatch PedometerAlcatel Smartwatch Features
Health Monitoring via a built in heart rate monitor with its own gyroscope, accelerometer and e-compass allow it to track things like sleep cycle, steps taken, distance traveled and calories burned like most high end smartwatches.

Notifications and Multimedia Control that makes the watch vibrate if you get too far from your phone as well as a feature that allows you to make your phone ring if you can’t find it. Of course if your that close to it for the connection and can’t find it you may want to go take a nap and recharge yourself. One cool feature that doesn’t require a third party app like other smartwatches is the remote camera shutter. What this means is you can set your phone within range and take pictures from the watch through the phones camera.

Alcatel’s Smartwatch Battery
According to Alcatel their smartwatch will last two days easily and under light use can last up to 5 days on a single charge. This is no doubt a better battery than any other smartwatches of this caliber as most Android smartwatches only last around a day and a half at best and Apple has already stated theirs will need to be plugged in each night to recharge.

Alcatel Smartwatch Price
This is not being marketed as a high end smartwatch thus the starting price is $149 which to date is cheaper than almost all other smartwatches on the market. With its round display and overall look of the Moto 360 the price may make your decision if choosing between the two. The features don’t seem to make it stand out over other smartwatches available and doesn’t have Google’s voice commands which is a drawback. This said if you own and iPhone and are looking for a smartwatch this may be the perfect one for you. The expected release is March and will be available on Amazon.

How to Convert a Micro SIM Card to a Nano SIM Card (Template Available)

Free microSIM to nanoSIM card template
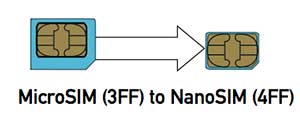
The new Google Nexus 6 by Motorola is a huge phone but they have changed the SIM card slot to make it even smaller from a Micro SIM to a Nano SIM. They saved even more space than they did in the Nexus 5 although this is causing problems with those that even own the previous Nexus 5 as the SIM card does not fit.

You can always take your SIM to a carrier store and have them replace it by transferring your number to a new Nano SIM but its pretty easy to do yourself. In some cases the carrier will charge for the new SIM and you have to make a trip to the store. You can also buy a SIM card cutter from eBay but why buy something you may only use one time.

IMPORTANT: Take your time as once you cut the card down there is no going back. This said if you mess up your right back where you started and just need to head to your carrier store to have them do it.

Convert your Micro SIM to a Nano SIM DIY Instructions

STEP 1: Print your cutting template
The cut down is a simple process and can be done by eyeballing and should work just fine although a template may be easier for most. The template will also make sure that you cut it perfectly and avoid making it too small to fit into your new phones Nano SIM slot snug. The template will ensure that you get it done right the first time without sweating the process. (Micro SIM (3FF) to Nano SIM (4FF) card Template)

NOTE: Make sure you print the template full size and not reduced or blown up or you will run into issues.

STEP 2: Trace the template to create lines on your Micro SIM
Place your Micro SIM on the template so that it is setting in the outline matching you cards size to verify that it is the correct card to convert from. Once you have done this you can stick it in place using a double sided tape of any kind to be sure it does not move. Use a ruler or any other straight edge to trace along the template across your SIM card with a thin pen or marker.

NOTE: You will be cutting some of the gold off the SIM card, this is ok and will not hurt the SIM card as only the center part is read.

STEP 3: Cut Your SIM card along the lines you created
Take your time and cut slowly to avoid damaging the card, its small so even at your slowest it won’t take long. Be sure to use a very sharp pair of scissors or a razor blade to get clean smooth lines so that it fits into your new phones Nano SIM slot cleanly. Again don’t worry about damaging the chip as the small square in the center is all that is actually read (follow the template and you will be fine).

Final piece of advice
If you notice that tour new Nano SIM is rough around the edges or isn’t quite fitting into the Nano SIM card slot on your device take a small piece of sandpaper (or just use your finger nail) and smooth it out slowly by hand.

Olixar Selfie Smart Pole Review

Taking pictures of yourself or selfies as its been deemed is something that everyone does with their smartphones. The process is a bit of trial and error and can be complicated depending on what you are trying to get in the background and when trying to capture larger groups. The Olixar Selfie Smart Pole allows you to extend your smartphone out in front of you and easily take a picture from a distance.

Olixar Selfie Smart Pole Review
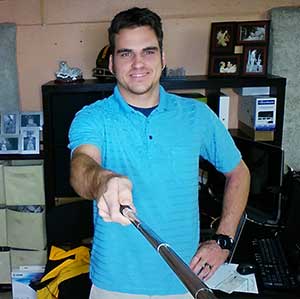
I decided to give the Olixar Selfie Smart Pole a shot to see how well it actually works and to my surprise it is awesome. To the right you can see a picture I took with my Nexus 5 at the end of the pole. I intentionally angled the camera down to catch the pole so you could see it was taken using it. There are several other “Selfie Poles” out there although I will show you why this one is better than those you see at the checkout line in Steinmart.

Why use a Selfie pole like the Olixar Selfie Smart Pole?
Lets be honest taking the perfect selfie is difficult by nature because you can only extend your phone out as far as your arms reach. This is even more difficult as you have to try and hold the phone still when taping on the camera button to take the picture. You miss surroundings and in many cases cutting people out of the picture if they aren’t right up against you. The Smart Pole allows you to extend your device far enough that its almost as if someone took the picture for you.

Olixar Selfie Smart Pole Design
The pole extends out like the leg of a tripod with a groove in it so that it does not spin causing your phone to drop to the bottom. There is one switch to turn the power on and off at the base of the handle and a button for taking the picture that is placed on the top of the handle so you can naturally press it with your thumb. The hollow steel extension makes it light weight and the rubber grip allows you to hold on to the pole without worrying about dropping it. There are also different smartphone mounts to allow fitting any size phone with or without a case. These mounts extend and have grip to hold your phone securely as well.

Olixar Selfie Smart Pole Features
Of course the most important thing about the Olixar Selfie Smart Pole is the fact that via a Bluetooth connection you can take the pictures using a single button on the handle. The retractable design feature also makes it very portable and allows you to take pictures from different distances as needed up to 1005 mm. The pole charges via microUSB at the base of the handle right beside the power switch. So far it seems a single charge lasts at least a week although might be longer as we are still on our first charge (45mAh battery capacity for those that are curious). You can use the Olixar Selfie Smart Pole on iOS devices and Android devices both so no matter what phone you have or will have it will work just fine.

Final Thoughts on the Olixar Selfie Smart Pole
While the item here is the smart pole you can also use the 2 mounts that come with it on your own tripod to mount a phone to it for video recording and such. This while not an actual feature of the pole seems worth mentioning. We have seen a few different selfie poles available and this one easily has a more solid feel to it as well as ease of mounting your device. For a full review check out the video below as its much easier to show you the Olixar Selfie Smart Pole than to talk about it.  The pole will set you back about $20.

KidFit Children’s Wireless Fitness Band Review

The KidFit wireless fitness tracking wristband will monitor your child’s health and fitness by encouraging exercise by having fun. It also allows kids to build their confidence by accomplishing goals. Everything is tracked and viewed through its free KidFit app available on iOS and Android devices (requires iOS 7+ or Android 4.3+).

Fitbit for KidsKidFit Fitness Wristband Design
This fitness tracking wristband for children has a design completely though up to handle the harsh circumstances that it will have to endure on a kids wrist. First and foremost the kids wristband comes in several colors including pink, black, blue, and yellow to fit your child’s likes. The fitness band also has a splash proof design to help keep it safe against water, it has an IPX3 rating basically meaning it is resistant but not water proof. We would like to see this band water proof although just keep it away from the pool.

It also has a wristband that wraps the wrist instead of using clasps making it fit any size wrist. The tracker piece itself is removable to allow it to be charged via USB. There are four different LED’s that show the status of the wristband being blue for syncing, green for activity tracking, red for charging and orange for sleep tracking.

KidFit Fitness Wristband Features
You can get the KidFit app for free on both Google Play and the Apple App Store. With the app you or your children depending on their age can set goals and tasks that challenge them to play harder than normal. The wristband has a scoring system that goes from 0-100 to make it easy for children to understand. The wristband app also helps by giving encouragement and advice when synced with the fitness band. It is nice that there are default goals that have been set for children although you can easily add your own custom goals which is a nice addition. One of the better features of the KidFit is its ability to track your child’s sleep cycles. This tracking also gives a graph and score based on how well they slept.

Personal thoughts on the KidFit
There are several things that I would like to note here. I have two young daughters 5 and 6 weeks (obviously only one of which is old enough to use this). We gave her a Fitbit to try because she wanted one after seeing her mother and I wearing them. The Fitbit was difficult for her to snap on and it was really no fun for her at all. She was incredibly excited after just seeing the bright pink wristband of the KidFit. Once she had it in hand she easily slapped it on her wrist and that was it. See below a review by a child (What better to give you thoughts than a child).

VIDEO AVAILABLE SHORTLY

The KidFit Fitness Tracking wristband for kids is a great addition to your holiday gift list and costs about $63. Your child or children will love the wristband as just a bracelet and its fun slap on band. On the other hand the fitness tracker for children will allow you to track sleep patterns and a fun way for your kids to stay active. In a world of obesity and health concerns this is a great start to getting your kids to stay in good health of their own free will while having fun with it.

Comparison of the Four Best Smartwatches of 2014

With so many wearables in 2014 we decided to pick what in our opinion are the best four smartwatches to date and compare them. While becoming more and more mainstream every day smartwatches are beginning to gain popularity and increasing in quality with each new release. Another watch that could be added later is the Sony Smartwatch 3 although we do not have one to test so have left it out for now.

We decided to compare the Zenwatch by ASUS, Gear S by Samsung, Moto 360 by Motorola and the G Watch R by LG. This is only four of many smartwatches currently available although they seem to be the most popular right now. We aren’t going to get into fitness bands or devices like the Pebble. This is only comparing four full feature smartwatches.

Operating System ComparisonBest Smartwatch of 2014
Three of the four smartwatches run Android Wear, Google’s material card style Google Now with voice based software. The Samsung Gear S is the one outcast running its own proprietary Tizen OS for wearable devices. Regardless of which of the two platforms you choose there are not nearly as many apps available as we’d like to see. This said Android Wear does have more to offer currently than Samsung’s Tizen OS.

Bluetooth and Network Connectivity Comparison
All four of these smartwatches pair to your mobile devices via Bluetooth although the Gear S also has 3G connectivity. This allows you to add a SIM and use the smartwatch without pairing it to a mobile device. The one thing you will have to note is the Gear S requires its own data plan.

Android Phone Compatibility Comparison
All four devices require Android 4.3 or newer although again Samsung has the outcast again since it only works on Galaxy devices or again standalone. If you aren’t using a Samsung device you will want to go with the Moto 360, G Watch R, or ZenWatch. Non of these watches work on the iPhone’s or Windows phones although assuming you here on Android Advice and reading this article your using an Android device.

Smartwatch Design and Build Comparison
All four watches are premium builds although there are differences in each of them. The ZenWatch, Moto 360 and G Watch R are all stainless steel in build with the Gear S being plastic. The ZenWatch is the heaviest of all four although not noticeably by any means. The Moto 360 and G Watch R both have round displays looking like a traditional watch and the ZenWatch and Gear S have curved rectangular displays. The Gear S has the largest display at two inches with the G Watch R having the smallest although you likely won’t notice much difference between the three Android Wear screen sizes as they are close. As far as physical buttons go they all have one. One last feature that is different between the watches builds is water resistance. The ZenWatch has little resistance to the elements while the other three can fall into water for a short time and survive.

Battery Life Comparison
The weakest of the three in terms of battery life is the Moto 360 with its 320mAh battery that may last a full day with light use. The Gear S and G Watch R have a 300mAh and 410mAh battery respectively although both last about 2 days on one charge. There was recently an update to the Moto 360 improving its battery life helping it make it through a full day but still making it the worst. As far as charging goes the Moto 30 does have wireless charging capabilities while the other three do not. The ZenWatch and G Watch R have magnetic charging cradles with the Gear S having a much cheaper feeling snap on charger.

Smartwatch Price Comparison
The ZenWatch comes in as the least expensive smartwatch priced at $200 with the Moto 360 coming in right behind it at $250. The Gear S and LG G Watch R both come in at $300 although again take note that the Gear S will require a data plan of its own to use.

Conclusion
I personally prefer the G Watch R after using all four watches for two reasons. First of all the watch easily lasts a full day and in most cases can go two days on a single charge. Reason two is the design seems to match my style and looks like a traditional watch. If I had to give a third reason it would be the fact that I switch phones almost monthly (nature of running a blog like this) and it works on them all. This said style will be a personal preference and of course the G Watch R is one of the more expensive smartwatches out there. Let us know in the comments if you have a favorite and why.

Google Fiber Now Available in Austin Texas

Those lucky enough to live in Austin Texas can now get Google Fiber in their neighborhoods right now. Google has been marketing hard to Austin in the form of a video that explains why Google Fiber is in their best interest and the benefits of having it. Google Fiber is their 1Gbps internet service that blows any other service in the area out of the water.

Google Fiber now in Austin, TXThe video shows a lot although some of the key points are a teacher in a classroom showing her class high resolution 3D images of Mars, a musician playing a guitar with a friend via a live internet video connection and a grandmother video chatting with her grandchildren. See the video up next:

While you can do all of these things with a normal broadband connection just fine imagine how much smoother it is with a 1Gbps connection via Google Fiber. This will allow much more data to cross the lines much quicker. This means almost to no lag or drops as well as the best possible quality for video and communication processing.

Currently Google Fiber is only available in Kansas City, Austin and Provo although talks and actions have been taken to start branching out to other major markets. Some of the other cities that can expect Google Fiber before long is Atlanta, Charlotte, Nashville, Phoenix, Portland, Raleigh-Durham, San Antonio, Salt Lake City, and San Jose. These additional areas that should see Google Fiber soon have submitted their paperwork to Google meeting the deadline requirements. This means they are just waiting for Google to make their move.

In the mean time enjoy Google Fiber all of you Austonians and let us know how you like your new screaming network.

Easily Migrate an Android App to Google TV

Since Google has released their new Nexus Player they want to make it easy for developers to migrate their apps to the Android TV platforms. We have seen Google release units before with no luck when it comes to app compatibility from developers although now they have broken down the process to make it easy. The standards and compatibility for apps to be approved have been laid out below.

Understand Guidelines and Requirements
There has been a list of TV quality guidelines for app developers to easily understand the criteria for releasing their apps on the Android TV platform. Google only allows those that meet the guidelines to be available to the general public through the play store.

Migrate Android App to Android TV
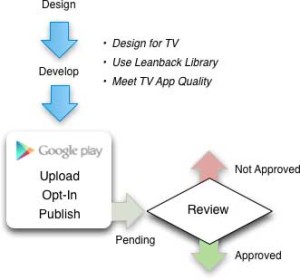
Develop a Great App for TV
Making your app take advantage of the Android TV input capabilities such as the gamepad and controller as well as larger screens is a must. Usage of the leanback library included in the Android SDK allows you to optimize your app for the TV. They also recommend that you use the same package name and store listing as your mobile versions of the app to keep the downloads, ratings and other statistics in tact.

Test your App for TV Quality
Performing smoothly and looking great on the large screen is a must as well as user experience consideration. Pay attention to the new material design and be sure to incorporate it as often as possible within the new version of the app while striving for simplicity and usability.

Opt-in to Android TV and Publish the App
Once you have thoroughly tested your app and make sure you meet all of the quality guidelines you can upload it to the Play Store via the Developer Console. Be sure that you Opt-in to Android TV from the Pricing and Distribution section of the Developer Console as well before publishing. There are however two requirements to opt-in and they are declaring that your app does not require a touchscreen and within your App Manifest you have to include the intent type of Action Main with CATEGORY_LEANBACK_LAUNCHER.

Last Track your Review and Approval
If everything meets the criteria for Android TV great it will be available on Google Play. If for some reason you don’t meet the criteria then you will get a notification email detailing the areas that need to be addressed before re-uploading to the developer console.

For many this may still seem like a complicated process but when it all comes down to it you can pick it all up rather quickly. If you have any issues with the process or need more details along the way refer to the source link of this article for the full details of developing for Android TV.

Shazam In-Store Shopping Experience by Mood

Shazam In-Store is a new service provided by Mood backed by Shazam that creates a new marketing solution for businesses to reach their shoppers. We all know Shazam as the best music discovery app available but many people don’t realize the marketing potential with in the popular app. There are over 18 million songs discovered daily within the app with over 70% of shoppers having Shazam on their mobile device. This said its very easy to integrate these actions with a customers in-store experience.

Shazam and Mood Media In-storeWhat is Shazam In-Store?
This solution uses all of the popular technology with Mood’s experienced team to create a mobile marketing solution only Mood and Shazam could offer. The solution produces a completely customized mobile experience to customers devices from within stores. The technology will allow a business to promote special offers with exclusive content and their loyalty programs as well as social media and other solutions. Since Shazam already has over 475 million global users the structure is already in place without businesses needing to create or change their own mobile apps.

How does Shazam In-Store Work?
This new mobile in-store marketing solution works by engaging shoppers through the in-store music they already have assuming they already have Mood service in their stores using their “Presence” technology. We aren’t sure yet if this is available to businesses that use a music solution not provided by Mood. The way it works from a shoppers stand point is actually quite easy. Without getting too technical the shopper will walk into the store and Shazam the overhead music, the “Presence” technology has an inaudible sound coming over the speakers that triggers the businesses content directly to them through their smartphone (of course the music discovery will also complete as normal).

Only time will tell if this takes off or not although it seems to be a nice solutions for those already using Mood as their in-store music solution since everything is already in place. For more details on Shazam In-Store you would have to go to Mood’s site in the source below and contact them.

Update: Mood has released a video that can be Shazamed to see a live demo of how it works.  Play the video below and go ahead and give it a shot.  Make sure you have the newest release of Shazam downloaded to get the Shazam In-store experience on your device through the following video.

Official Press Release

AUSTIN and NEW YORK, Nov. 24, 2014 – Mood Media Corporation, the global leader in Experience Design, today announced a new partnership with Shazam that includes the official launch of Shazam In-Store, a location-based mobile marketing product combining the power of Shazam, one of the world’s most popular apps, with the strength of Mood’s proprietary Presence technology.

Shazam-In Store, part of Shazam’s larger expansion strategy into consumer-facing environments, is integrated into the existing Shazam app and offers brands the opportunity to connect to Shazam’s more than 100 million monthly active users. The solution is the first to use Mood’s Presence signal, and connects to consumers’ devices via an inaudible digital watermark through retailers’ overhead music systems. In order for it to connect, first, a customer must activate the Shazam app to identify a song or audio message. Then, the app will recognize the watermark and deliver the requested song information and the business’ targeted content directly to the customer’s mobile device. Read more…

How to Easily Root the Nexus 5 on Android 5.0 Lollipop

The Nexus 5 has barely had the Android 5.0 Lollipop update for a week and already there is an easy way to root the device. Some people still haven’t received the update on their devices but here is how to root it if you have it or when you get it.

Important: Rooting your Nexus 5 will wipe all data from the device so be sure to backup anything you don’t want to lose before moving on. There are risks associated with rooting your smartphone or tablet and you should be aware and ok with this before rooting your Nexus 5.

Required Files to Root the Nexus 5 on Android 5.0 Lollipop
(Download)
Contains ADB Tools, SuperSU, ClockworkMod Recovery and the modified boot img

Nexus 5 Android 5.0 Lollipop Root Instructions

  1. Enable USB Debugging on your phone by navigating to the “settings -> developer options”. If you don’t see developer options you need to go to “settings -> about phone” and tap the “build number” repeatedly 7 times to enable it.
  2. Connect your phone to the PC via USB and wait for your Nexus 5 to be recognized.
  3. Extract the required files downloaded above and navigate to the “N5 Lollipop Root” folder.
  4. Copy the “UPDATE-SuperSU.zip” file to the root of your Nexus 5 (not within a folder)
  5. Restart your Nexus 5 in fastboot mode by turning it off and then holding the “Power + Volume Down” buttons at the same time until you see the fastboot menu.
  6. From a command prompt navigate to the “N5 Lollipop Root” folder
  7. Type “fastboot flash recovery recovery-clockwork-touch-6.0.4.5-hammerhead.img”, press enter.
  8. Type “fastboot flash boot boot.img”, press enter
  9. Now that you have the modified boot image installed use the volume keys to navigate to select “Recovery Mode” and press the power button to select it.
  10. From within recovery you now need to use the volume keys to select “install zip” then select “choose zip from SD card”
  11. Next you need to select “UPDATE-SuperSU.zip” (you may have to look around for it) then press power to select it.
  12. Once you see “Install from SD card complete” you can back out to the main menu and reboot your Nexus 5.
  13. Congrats your Nexus 5 is Rooted running Android 5.0 Lollipop.

The first boot after rooting your device will take a long time and of course that is why we always recommend a full charge before starting the process. Make sure you leave your phone plugged in until it completes booting into Android to avoid any issues along the way.

Also if you run into a boot loop after restarting your phone do not panic. Turn off your Nexus 5 and reboot back into fastboot mode as you did earlier but this time go to Recovery and wipe data, wipe cache partition and reboot again. Sometimes with any root process you need to wipe the data to avoid hanging.

Let us know if there are any steps that are confusing or if you have any additions we should make. Good luck and happy rooting.

FlexiShield Google Nexus 6 Case Review

All things considered the Google Nexus 6 is a rather large device and as such is hard to find a case that will fit it without making it even larger. The FlexiShield Google Nexus 6 Case fits the Nexus 6 snug without adding a lot of bulk to the device like say an Otterbox would. This said lets look into the pros and cons of these cases so that you can make a decision for yourself.

Thin Google Nexus 6 Case
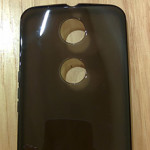
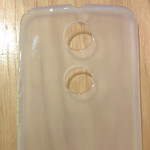
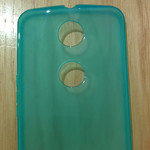
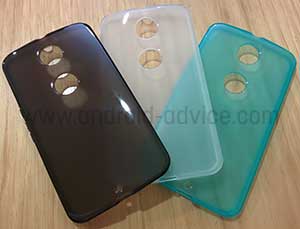
FlexiShield Google Nexus 6 Case Design
The FlexiShield case is made from a gel material that while flexible is still quite durable allowing small drops from the device without both breaking your phone and scratching the case. The back and sides of the case have a non-slip coating and lets be honest with a phone the size of the Nexus 6 we need all the help we can holding onto the phone in one hand. Most importantly its a thin case that avoids too much added bulk. You will notice on the front of the case when on your phone there is a raised bevel to help protect against screen scratches when placing the phone face down. The FlexiShield case comes in multiple colors with a translucent finish, the colors are frost white, smoke black, blue and purple.

FlexiShield Google Nexus 6 Case Protection
There isn’t much to say about the cases protection other than the fact that small drops will be protected although from 6 feet up you are taking a crap shoot. I do have to mention that the fact that the case is made of a rubberized material that it does take a bit of the impact from drops although it is thin enough that it may not survive solid drops. This said it is not marketed as a tough case and therefore should not be thought of as one.

FlexiShield Google Nexus 6 Case Price
I do have to say that the most appealing thing about this case is its price. You can get the FlexiShield case for around $7.99 meaning there is really no reason not to get it if your on the fence. You can even honestly just grab a couple different colors to match your style for the day.

Conclusion
This is in no way a highly protective case but for those that don’t normally use cases or just want to add it for better grip its a good one. It will protect against nicks and scratches to keep your Nexus 6 looking new forever. If you have anything to add please feel free to let us know below. You can find this and other cases like it at Mobile Fun.