How to Factory Reset the Samsung Galaxy S5

If you want to restore your Samsung Galaxy S5 to factory settings to sell it or even just start over its a pretty standard and simple process. Of course it is important to wipe all data including photos, contacts, apps, and accounts before giving up your device to anyone. Personal security is a huge issue in the smartphone world and wiping all data ensures your personal information is safe and completely deleted from the device.

We recommend having your Galaxy S5 completely charged and even plugged in during this process to ensure it does not die during the factory reset. If your GS5 dies during the process it could cause permanent damage to the device.

How to Factory Reset the Galaxy S5

How to Reset the Galaxy S5 to Factory Settings

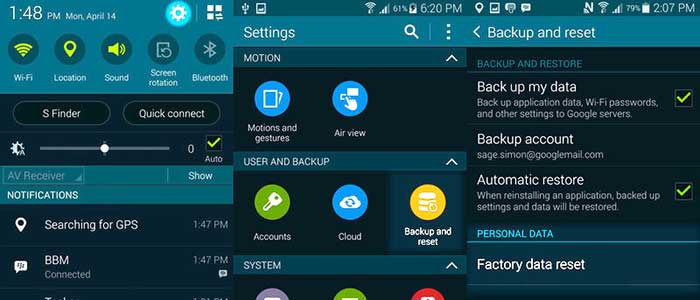
  1. swipe down your notification bar and select the Gear icon for settings
  2. navigate to the “User and Backup” section
  3. select “Backup and reset”
  4. select “Factory Data Reset”
  5. review the next screen and verify everything to be deleted
  6. finally tap “Reset Device” and wait for the process to complete.
  7. Congrats your GS5 is back to its factory condition!

If you have an SDcard in the phone be sure to take it out as this process will keep the card in tact and odds are that is where you have all your photos and things that you want to keep. If you have any issues with the process or feel we have missed something please leave us a comment below. We hope this helps you factory reset your Galaxy S5.

How to use the Samsung Gear Fit with a Nexus 5

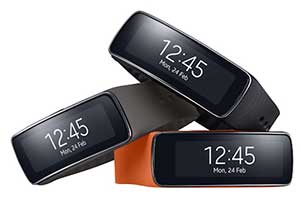
Gear Fit for Nexus 5The Samsung Gear Fit will work with many other Android devices including the Nexus 5. Keep in mind that Samsung has yet to make its line of Gear smartwatches officially compatible with devices other than their own at this point. There have been rumors of the Gear line getting official support for other devices and hopefully this will be the case in the future. Until mass compatibility becomes a reality there is a way to get it working on just about any Android device running 4.3 or higher.

How to get Gear Fit working on a non-Samsung phone
Sideload the Gear Manager and Gear Fitness APK’s on any device running Android 4.3 or higher. Yep its that simple to use the Gear Fit on your device.

Compatibility
You will not get full compatibility this way but it will allow it to work pretty well. Things you will get functioning will be features like notifications and find my phone. If you are looking to get 100% compatibility you will likely need to hold out for Samsung to officially support your device or wait for a bit more testing to see what else needs to be added.

Sideloading has been confirmed working on a few popular devices including the Nexus 5, One (M7) and One (M8) but will work on other devices as well. I’m not sure I would go out and grab a Gear Fit just yet if your not using a Samsung device but worth trying out if you just have to have one.

As we find other devices that are compatible and have the opportunity to test completely what features work and don’t work we will let you know here. Otherwise if anyone has a chance to try it on their device let us know what you come up with via comments below. Hope this helps you get the Gear Fit working on your non-Samsung device.

Review: MyKronoz ZeBracelet Smartwatch for Women

Ever since CES 2014 we have been told that wearables are what its all about right now and the ZeBracelet seems to be the first wearable created for women. The ZeBracelet is a smartwatch made by MyKronoz that actually comes in a lot cheaper than most smartwatches that have been released this year. When we see a smaller price on a smartwatch we assume there are features that are missing or a quality decrease to save money. So here is our MyKronoz ZeBracelet review for those of you looking for a smartwatch under $99.

ZeBracelet Design
Most smartwatches are bulky and you can tell at a glance what it is. The ZeBracelet is a watch although if you see someone wearing it you would assume it was nothing more than a nice looking bracelet. There is no break in design between the band and screen and the buttons are small and keep to the smooth curved design. The bracelet is easy to to put on with a slightly flexibly band open at the middle (of course the portion with the screen does not flex). The smart-bracelet is much stronger and well built than expected.

One design feature that we thought interesting is the curved glass of the watch face for the sleek look with a smaller flat screen behind it that actually has the display itself.

ZeBracelet Features
You will notice most of the basic features of any other smartwatch should have although you won’t see the advanced features like mail and text messaging capabilities. You can easily pair the smartwatch with your phone to allow answering and rejecting calls using the side buttons. One disappointment was the fact that when you get an incoming call it will show the number but not the name of the caller. This said you can answer the call using the bracelet’s built in speaker and mic which is plenty loud and clear enough to be useful. When you get a phone call the bracelet will vibrate to let you know you have an incoming call.

One feature that is pretty cool is using the bracelet as a speaker to play music from your phone. This said don’t expect the quality to be any better than your phones speaker as its meant more for phone calls than music. There is also an alert on the bracelet that causes it to vibrate if it gets out of range of your phone to help you from leaving your phone somewhere and walking off.  You can find the ZeBracelet at many different retailers online.

Conclusion
As stated before this is probably the only option for most women with its sleek bracelet design and solid build quality. The smartwatch also has a great integrated microphone and speaker as well as all of the essentials a smartwatch should have. A few of the negative aspects of the smart-bracelet are its smaller screen compared to others and the lack of caller ID (name). I do recommend the MyKronoz ZeBracelet for women looking to get a smartwatch that looks like an accessory and not a bulky smartwatch.

How to turn off GeoTagging pictures on Android devices

Disabling GeoTagging of images on Android devices has been a hot topic due to the security implications of people easily being able to see where your pictures are taken. This opens your location up to not only hackers but anyone with a simple browser plugin.

When a picture is taken on an Android device it is automatically encoded with the type of camera used as well as the location, date and time. Many users turn their GPS off to try and avoid locations being tracked, while it helps it does not stop the tracking addition to your pictures. It does however reduce the accuracy by giving a rough location but is still quite accurate.

The only way to completely protect yourself from people tracking your location through pictures is to disable geotagging completely on your device. The process is quite easy and is completed through the camera app itself.

Disable Nexus 5 GeoTaggingDisable GeoTagging Instructions (most devices)

  1. Open your devices camera app
  2. Open the camera apps settings
  3. uncheck the box labeled “Geo-Tag Photos”
  4. Congrats, your pictures no longer get tagged!

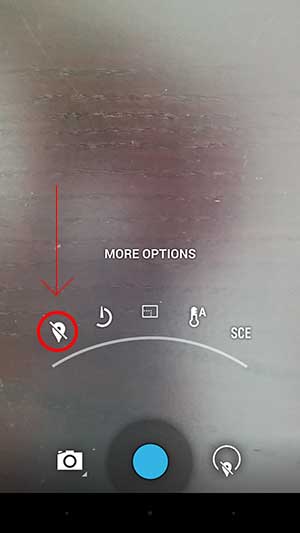
Disable GeoTagging Instructions (if newer device)

  1. Open your devices camera app
  2. Tap the circle icon (right side) for some settings
  3. Select the pin icon so that it has a slash through it
  4. Congrats, your pictures no longer get tagged!

This will cover most cases where tagging is completed although certain apps like Facebook, Instagram, Flickr and Foursquare will also GeoTag photos but usually pops up within the application at upload asking if you would like to tag the photo. If you don’t get a popup you can easily open the settings for these apps and look for location and/or tagging options.

If you have any issues please feel free to ask via comments below. Otherwise I hope that this has been helpful to disable GeoTagging on your Android device.

How to Rearrange, Add and Remove Homescreens on the Nexus 5

Google’s Nexus 5 has been around for a while now but may be new to some of you. This said there are some features of the device that may be difficult for those users not used to using Android or who have previously used other devices with skins like Touchwiz or Sense. In some cases home screen management is different even on the same version of Android depending on the device.

When you first get your new Nexus 5 it will have one screen and when swiping to the left you will notice Google Now. What if you want more that that to add app icons to other screens? Those of you interested in learning how to add and remove home screens on your Nexus 5 can see below and easily manage it. Keep in mind that the launcher is unique to this device as such are the instructions shown here.

Add and Remove Homescreens
The process is extremely easy and may not even need this article although here is it anyway. Also take note that on the Nexus 5 you can create as many new screens as you’d like and aren’t limited to just 5 or so.

  1. Press and hold any icon on the first screen until the screen changes and you see its selected.
  2. slide your finger over to the right side of your screen and hold it there until the screen slides to a blank area.
  3. Release the app icon wherever you want it on the newly created screen.
  4. Repeat as many times as you’d like to create new screens.

You will notice after creating new screens that the small white dots above you bottom row of static app icons will increase. As such you will also notice that the dot corresponding to the screen you are on currently will be highlighted.

How to Rearrange Homescreens
After getting all of you screens setup you may realize that you want the pages in a different order but don’t want to take the time to delete and recreate them. While Google didn’t create an easy way to delete an entire screen you can easily rearrange them.

  1. Tap and hold you finger on any blank spot on a screen until the window changes
  2. You should see the transparent background on the window selected as well as a window to the left and right.
  3. Lift your finger and re-tap and hold the screen you want to move until you see it has been selected.
  4. slide the selected window left of right to change the order
  5. Repeat as many times as necessary to get the screens in the correct order.

While both of these methods are easy enough Google did seem to make this more difficult than it needed to be. If you have any other issues or run into a problem following these instructions please let us know via comments below. At any event thank you for reading and I hope it helped.

How to Improve Nexus 5 Battery Life via Settings

If you own a Nexus 5 you know that it already has a pretty good battery compared to many other devices in its class. This said once you get all your apps installed you may notice that your battery isn’t lasting as long as it once did. There are easy things you can do to increase battery life to continue getting a full day out of your smartphone.

While your Nexus 5 will never be able to compete with devices like the Droid Maxx or Note 3 due to its smaller battery getting a full day out of any device is the goal. See the easiest ways to save battery below.

Save Nexus 5 Battery Life

Change Display Settings to Save Battery Life

  • Display Brightness – navigate to settings -> display -> brightness and drop the brightness down to about 20%. Auto brightness tends to use an enormous amount of battery power to control. This will give the greatest battery savings as display brightness is usually the largest drain on battery.
  • Sleep Time – navigate to settings -> display -> sleep and change the sleep time to 30 seconds. This will save battery power after using the device and setting it down. This way your not losing 2-5 minutes of battery every time you set the device down before going to sleep.
  • Animation Effects – navigate to settings -> developer options and disable animation effects. This may not be ideal for those of you that like all the fancy effects although if your looking to save battery it is a great way to accomplish this.

Change WiFi, 4G and Bluetooth Settings to Save Battery

  • WiFi – This is quite simple, if you have a connection nearby use WiFi, if your not around a WiFi connection turn it off. Wifi when connected saves battery by not hitting data towers as well as the opposite of not scanning for networks when not available.
  • Bluetooth – While Bluetooth is less of an issue when not in use it does still drain a bit of battery when on and not in use. This said if you have no use for it just turn it off although if you use it don’t worry about it too much.
  • 4G LTE – navigate to settings -> more -> mobile networks -> network mode and change from 4G to 3G (in some cases it will be labeled something else like H for AT&T). If you are in an area that has 4G then of course leave it active. This said if you are in and out of 4G coverage you can save a god bit of battery life by changing your preferred network connection to 3G.

Location and GPS Settings to Save Battery Life

  • GPS – navigate to settings -> location -> mode and select battery saving. This is another one of the major battery saving settings like display. This will decrease the accuracy of your GPS although can save a ton of battery life if you don;t need detailed navigation. Play with it and see if it still works good enough for your needs.
  • Location Services -> navigate to settings -> location and turn location off completely. If you rarely use your GPS or don’t need apps like Facebook to know where you are turing this off completely will save a tremendous amount of battery. Keep in mind that Google Now and other location based services will no longer work as well as you will want although for simply saving battery this is awesome.

App Syncing and Data Settings to Save Battery

  • Google Sync – navigate to settings -> accounts -> google -> and select your account. Next change the sync interval to the greatest amount of time you can live with. You can repeat this step with other applications that have data syncing via the accounts screen.
  • Notifications – within the accounts section from the Google Sync settings you will see notification settings. Here you can do several things to save battery like disabling notifications, unchecking vibrate, and turning off the notification light. All of these cause battery drain and can save battery life.

While these are some of the easier settings to change for increasing battery life on your Nexus 5 you can also root your device and install a custom ROM which in many cases increases battery life even more than anything you can do in settings. This said I hope this helps with you rNexus 5 battery. Please let us know if you notice anything else that helps and good luck.

Google Voice expected to merge into Hangouts this summer

Google Voice is said to be absorbed into Google Hangouts in the same way that messaging on Android devices integrates. This falls inline with their vision of one app that merges the functionality of all social and communication features Google has to offer.

Google Voice Hangouts MergerOnce Google Voice is integrated into the Hangouts application you will be able to make phone calls through it in the same way you can on the web currently. These calls will of course be the same VoIP calls you are currently used to. Also there will be no need to have both Hangouts and Voice apps on your devices.

The merge of services is supposed to take place this summer and will then make Hangouts the one stop app for system wide SMS messaging, chat, and VoIP calling. We can assume that other services will follow soon after at the rate Google is going.

Google Hangouts is becoming one of the most feature rich apps on any Android device and is proving to be not only a good move but also a useful for end users. This could increase awareness of features like Google Vice that your average user may overlook.

We will keep you informed as summer comes closer as to what to expect and more specifically when to expect it.

Samsung Galaxy S5 vs Galaxy S4 Comparison

As we all expected Samsung announced their new flagship phone the Galaxy S5 at Mobile World Congress last month. What we weren’t expecting is for the new Galaxy S5 to be only a feature upgraded device. We have quickly made it to the fifth generation of Galaxy flagship phones released by Samsung with it being available on April 11th to the general public.

When it comes to upgrading from your current Galaxy device to the S5 their will be a few factors that you want to consider and one of the important ones is the price. While there is no official announcement of the price there have been many sites speculating around $800 – $1000 for the SIM unlocked version. If you are debating on the S4 or S5 keep in mind that an S4 will cost you less than half that of the S5. Also keep in mind that the S4 will likely be even less expensive once the Galaxy S5 officially releases.

Galaxy S4 vs Galaxy S5 Design
When looking at the two devices laying face up you can barely tell they are different phones, which was also the case with the S3 to the S4 which is a bit disappointing. This being said when you turn them over and place them screen down you can see a different in design. The Galaxy S5 has a soft perforated battery door cover and also comes in a few additional colors like Electric Blue and Copper Gold.

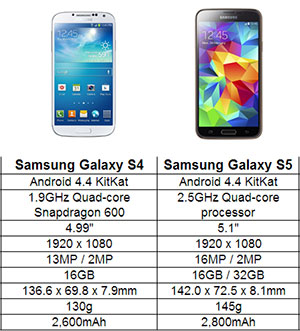
The Galaxy S5 is also slightly thicker and heavier than the GS4 due to its minor increase in screen size and a few new features. The weight difference is a noticeable 15g putting the device at 145g. The size increase is around 3mm wider and 6mm taller, its around 0.2mm thicker as well. With the added size does come some benefits such as its water-resistant and dust-resistant design.

Galaxy S5 vs Galaxy S4 Display
As mentioned already the GS5 has a larger screen but its only .1 larger at 5.1 over the 5.0 on the GS4. Even though their was a lot of talk about the GS5 having a super high-resolution display they stuck with the same Full HD 1080p on the S5 meaning that their will be a slight drop in pixel density (not human eye noticeable). One improvement you may notice though is the S5 has what is coined an Adaptive Display, meaning the display automatically adjusts color gamut, white tone and contrast based on lighting conditions.
Samsung Galaxy S4 S5 ComparisonGalaxy S5 vs Galaxy S4 Processor and GPU
This really depends on what version of the Galaxy S4 you are looking at or have. Most Galaxy S4’s have a 1.9GHz quad-core processor even though there is an Octa-core version out there. The Galaxy S5 has a 2.5GHz Qualcomm Snapdragon 801 processor. As far as the GPU the Galaxy S5 has been upgraded from the Adreno 320 to the Adreno 330. While the Galaxy S5 seems to have an improvement over the S4 you likely won’t care unless you are a power user as a normal use phone doesn’t really require the added power.

Galaxy S5 vs Galaxy S4 Connectivity
Most of the wireless tech hasn’t changed much giving both devices the same dual-band 11ac WiFi, Bluetooth 4.0 LE, NFC, A-GPS, and an infrared transmitter. One benefit to the GS5 is its microUSB upgrade to version 3.0 with a faster 4G LTE Cat4 instead of the GS4’s Cat3. You will also notice a really nice feature called “download booster” allowing you to take advantage of both 4G data and WiFi connections when downloading. This improves download speeds quite a bit. One very disappointing missing feature on the Galaxy S5 is wireless charging. Like the GS4 you will need to buy a Qi wireless charging adapter or special case to achieve wireless charging capabilities.

Galaxy S5 vs Galaxy S4 Camera
While camera’s are always improving we expected the jump in camera from the S4 to the S5 and did get the bump from 13MP to 16MP. This being said we hope the camera on the S5 will work better in low light that the GS4. As car as video capturing the Galaxy S5 has improved with 4k making it comparable to the Note 3 also allowing slow motion footage at up to 120 frames per second. The front facing camera is the same 2MP 1080p found on the Galaxy S4.

Galaxy S5 vs Galaxy S4 Software
Of course the GS5 comes out of the box with Android KitKat and will be upgradeable to at least one more version of Android in the future. The GS4 now has KitKat almost across the board although will not likely see updates as long as the S5 as history can tell. The home screen on both the GS4 and GS5 seem to be very close and almost no noticeable changes to mention although he Touchwiz overlay throughout the device has made many areas look very different.

Some of the visual differences you will notice is when swiping away from the main screen things have been simplified. There are rounded icons within the notification menu as well as settings menu. One item for those of you with kids is the new “Kid’s Mode” allowing restricted access as well as a private mode to hide what your doing from others that may be … well private.

Galaxy S5 Features not Found on the GS4
Two great features that you may or may not know can be found on the Galaxy S5 are the fingerprint scanner and a heart rate monitor. Neither of these are available on the GS4. The fingerprint scanner is said to have a few different features, first being the standard usage for unlocking your device and the other being for authorizing payments via services like Paypal. The scanner requires you to slide your finger down it to use not just statically placing it over the home button. The heart rate monitor is what it sounds like and can be found below the camera on the back of the GS5.

Galaxy S5 vs Galaxy S4 Battery
Okay so one of the most important things that everyone wants to know about is battery life. The Galaxy S5 does improve on the battery with a 2800mAh battery which is 200mAh better than the GS4’s 2600mAh battery. Another feature that should prove to improve battery life is the new Ultra Power Saving mode Samsung has added to the GS5. What this feature will do is turn off all non-essential functions besides calling and messaging. On top of this it also switches the phone to black and white to save as much power as possible. Samsung states that in this mode 10% battery can last up to 24 hours. If nothing else we think this feature makes the Galaxy S5 worth looking at.

Will you be getting a Galaxy S5? If you are what is the feature that was the deciding factor? Also if you decide that the GS5 just isn’t the device for you, what was the reason? Personally if we weren’t going to get one for Android Advice we probably wouldn’t buy one for personal use
Best Android Tablet’s Q1 2014 on a Budget under $100

When you are looking for an Android tablet on a budget you end up finding a lot of tablets you have never heard of. Many of these low cost tablets are also low end although you can find some good ones if you look hard enough. We decided to make it a little easier on you by compiling a list of the ones worth looking at. The idea of a list originally came from a business looking to buy a few hundred tablets for potential clients but wanting to keep the cost per tablet around $100. With $100 as a price point we compiled a list for those of you that may have the same budget.

These tablets are by no means new tablets as of this year although they are still nice tablets on a budget.  Also keep in mind that they will not be as powerful as a brand new high end tablet either.

Best Android Tablets Under $100

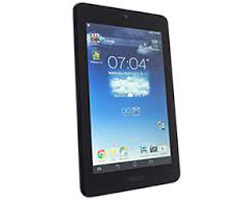
1. ASUS MeMO Pad ME172V-A1-GR VIA WM8950 – The first tablet on our list is the ASUS MeMO Pad 7-inch tablet since it packs some pretty good specs for a low cost tablet with its 16GB storage and 1GB DDR3 memory. Another good reason to check this one out is the fact that its running a newer version of Android, Android 4.1 Jelly Bean. I won’t lie to you, one of the reasons the MeMO Pad was chosen as the winner in this category is the fact that ASUS has been known to support their tablets very well.

ASUS MeMO Pad 7ASUS MeMO Pad Specifications:

  • Android 4.1 Jelly Bean OS
  • 1GHz VIA WM8950 processor
  • 7″ 1024×600 Display
  • Mali-400 GPU
  • 16GB Flash Hard Drive
  • 1GB DDR3 Memory
  • 1MP Front Facing Camera
  • 4270mAh battery (7 hour life)

Currently on NewEgg for $89 – http://www.newegg.com/Product/Product.aspx?Item=N82E16834231560

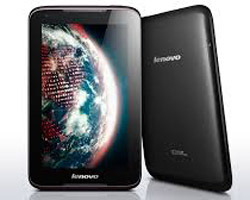
2. Lenovo A1000 (59374135) – Coming in second is the Lenovo A1000, again a name brand tablet on a budget. We have placed it second only because it has integrated graphics and half the hard drive storage. This being said its still a great tablet and was very close to being number 1.

Lenovo A1000 7Lenovo A1000 Specifications:

  • Android 4.1 Jelly Bean OS
  • 1.2GHz MT8317 Processor
  • 7″ 1024×600 LED Display
  • 8GB Solid State Hard Drive
  • 1GB LPDDR2 Memory
  • 0.3MP Front Facing Camera
  • 3500mAh Battery (7+ hour Life)

Currently on NewEgg for $99 – http://www.newegg.com/Product/Product.aspx?Item=N82E16834312839

3. AGPtek TP718AQ+p45 – This AGPtek tablet may be brand that you’ve never heard of but we have to say the specs are not that bad for a tablet you can get brand new for $99. Of the three this one has the fastest 1.5GHz processor, Android 4.2 and an HDMI out port. Although some of the other features keep it under the other two like it not having bluetooth and its smaller 2650mAh battery.

AGPtek 7 inch tabletAGPtek TP718AQ+p45 Specifications:

  • Android 4.2 Jelly Bean OS
  • 1.5GHz Cortex A7 Quad Core Processor
  • 7″ 1024×600 Display
  • 8GB Hard Drive
  • SGX544MP2 OpenGL ES2.0 Open CL1.x,DX9_3 GPU
  • 1GB Memory
  • 0.3MP Front Facing Camera
  • 2650mAh Battery

http://www.newegg.com/Product/Product.aspx?Item=9SIA0U01AU8289

I’m sure there are many other Android tablets out there under $100 worth mentioning although its hard to find the good ones.  Most of your budget tablets once in hand are as cheaply made and slow as expected although as you see above you can still find a good one if you look hard enough.  Personally I think the Lenovo vs the ASUS tablets are personal preference as they both have redeeming features.

If you have others to add or think we are wrong about our picks above let us know as we along with others would love your input.

Download Flappy Bird for Android Since Google Play Removal

Flappy Bird Apk DownloadWith the release of Flappy Bird it quickly became the most addictive and popular game of 2014 in just the first month. After a while the developer pulled it from the Google Play store due to it being more frustrating for users than he had intended. This being said there are still many people who want to be able to download and play Flappy Bird since its removal.

Those of you that already downloaded Flappy Bird from Google Play can still (for now anyways) go and download it again. This being said if you hadn’t previously played the game your only chance of playing is to download the game via a third party APK and install it on your device.

This is the Android version of Flappy Bird, hence the .apk extension so if you have an Android device and want the game you can download it below.
Download Flappy Bird for Android

How to Install Flappy Bird on your Android Device:

  1. Download the Flappy Bird APK above
  2. Go to your Phones Settings then to Security
  3. Check “Unknown Sources” so you can install the APK
  4. Run the APK and the game will install

We have played Flappy Bird and think that it is quite addicting if you don’t get frustrated at the difficulty and throw your phone against a wall. This being said the best games have a level of difficulty that keeps you trying harder. Let us know your thoughts on the game as well as if you have any issues with the APK download.