Samsung Shows off New App Icons before Unpacked Galaxy S5 Event

Samsung Unpacked 5 New IconsWith less than two weeks until Samsung’s Unpacked Galaxy S5 event they have started releasing teasers like new app icons for the GS5. Samsung seems to have started teasing the event via its own blog sharing the image you see to the right. This looks like the original invitation to the Unpacked Event although has the addition of several new icons Speed, Outdoor, Curiosity, Fun, Social, Style, Privacy, Fitness and Life. These icons are different than those we’ve seen in their previous TouchWiz overlay.

We aren’t sure the reasoning for the new icons although we have a few thoughts on the matter. One of which is the simple fact that since the Google Samsung patent arrangement announced earlier this month they promised Google they would no longer copy their applications and/or icons. This being said none of these icons are replacements for existing ones in the outline provided by Samsung previously.

Our second thought on the new icons is the fact that Samsung has mentioned unveiling a new OS called Tizen for some time now and this could be the start of a transition. Getting people used to a skin like the one they plan on having if releasing a new OS could benefit its release.

Of course this is all speculation as to be brutally honest it is merely some new icons and nothing more. In the event that TouchWiz does get a complete overhaul in look and feel how likely will people be to accept it and continue to keep Samsung on top?

How to Transfer iPhone iCloud Contacts to Android Easily

Moving from your iPhone to an Android phone has been a daunting task in the past although there is an easy way to get this accomplished. The most important set of data that every user wants to move from one phone to another is contacts. This tutorial will show you how to easily transfer contacts from an iPhone to Android.

Apple has iCloud for backup and Android devices backup to your Google Contacts so essentially you just need to backup the contacts from iCloud and import them into your Google account. This being said there is a process that makes this easy and the steps are outlined below.

How to transfer contacts from an iPhone to an Android phone

  1. Easily transfer iPhone contacts to AndroidGo to iCloud.com
  2. Login with your Apple ID and password
  3. Click on your contacts
  4. On the bottom left click the gear icon for settings
  5. Select “Export vCard”
  6. Save the file where you can find it later
  7. Go to google.com/contacts
  8. Login with your Google credentials
  9. Click “More” at the top
  10. Select “Import”
  11. Select the vCard you exported in step 6

Once you have completed the steps above all of your contacts will be copied into your Google account and when logging into your Google account from an Android device will automatically pull them all in.

When you setup an Android phone for the first time it will ask for your Google account so that you can use the play store and other Google features. If you already have your Android phone setup you can navigate to the accounts and add the account you imported the contacts to (only if different from the one you already had setup on the device when setup originally). You can navigate to “Settings -> Accounts -> Your Google Account” to manage what gets synced as well as adding new Google Accounts.

If you run into any issues please let us know as well as any steps that may need to be added. Short of getting a new Android device that already has an app to do this for you this is the easiest method we know of to transfer contacts from iOS to Android seamlessly and quickly.

How to Get the Google Now Launcher on any Android Device

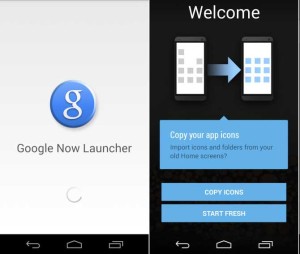
When the Nexus 5 was launched many of us noticed the Google Now Launcher when you slide to the far left window of your home screen. This launcher on the Nexus 5 is called the Google Experience launcher and until now was solely available on the Nexus 5. Google had announced that the feature would be unique to the Nexus 5 but there is a work around to get this on other Android devices easily. With Google’s update to its Search app the Google Experience launcher is now called the Google Now launcher and allows you to import your current icon and folder settings. While the Google Now Launcher is still only available on the Nexus 5 you can get it using the following steps.

Install Nexus 5 Google Now LauncherHow to install the Google Now Launcher on other Devices:

  1. Go to Google Play and install the Google Search Update. If you can’t get the update through Google Play then use the following link (Download Link)
  2. Install the Google Home APK from the Nexus 5 (Download Link)
  3. After the new launcher is installed you should now be able to select your preferred launcher from your phones Home button.
  4. From here you should actually get a setup to run through when selecting Google Now Launcher

The reason you get a setup when installing Google Home unlike previously is because the new Google Search update includes the setup not the Google Home App.  If you already have the Google Home APK installed but want to start over with the setup this time use the instructions below.

If you already have Google Home APK installed and want the setup:

  1. Force close the Google Home app
  2. Clear data from the app and uninstall it
  3. reinstall the Google Home APK form step 2 above
  4. Select the Google Now Launcher and the setup will begin.


Only download the Google Search update in step one if you can’t get it from Google Play. Some devices will not show the update but either way should work just fine. If you have any issues or notice something that we have missed please let us know in the comments below so that we can make adjustments to the article to make the process easier for others.

Why Tempered Glass Screen Protectors over Traditional Screen Protection

Everyone wants to protect their investment when buying a new phone and the first thing most people do is buy a case and or screen protector. Generally most of us buy a normal thin flimsy screen protector but there are better options out there now. Those of you that have already seen or used tempered glass screen protectors know they are superior in almost every way. Almost every user of any mobile device uses screen protectors so why not use the most protective version available.

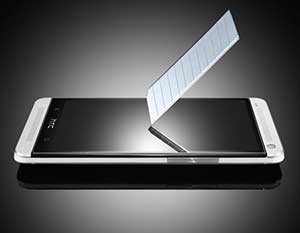
Tempered Glass Screen ProtectorBenefits of Tempered Glass Screen Protectors

  • Hard Surface – First and most important is the fact that tempered glass screen protectors are much harder than your traditional flimsy screen protector. What this does is allow for your screen to defend against scratches that others would show.
  • Easy Installation – The second fact is that installation is exponentially easier. You just set in place and it bonds pulling all bubbles out without having to work too hard.
  • Full coverage – most screen protectors only cover the screen and not the rest of the device face. Tempered glass protectors cover the entire front of the phone.
  • Natural Feel – Instead of the traditional sticky feel to most protectors you are actually placing another piece of glass over your screen making it feel as though there is nothing on it at all.
  • Longer Life – Most screen protectors tend to fade slightly as time passes causing you to have to replace periodically. Tempered glass keeps its look forever.

To show you how easy the installation is we recorded the application process on a Nexus 5. Feel free to check it out and we hope it helps you in the decision process.

Ultimately we have tried out a few different tempered glass screen protectors and have yet to have trouble with installation, removal or lifespan and feel that they are a good addition to your phones protection. We attempted to scratch the screen with fingernails and even dropped a device face down on concrete from a short distance and did not even scratch the glass. If you have used or plan on using a tempered glass protector we would love to hear from you below in the comments.  Also, you can get the screen protector for the Nexus 5 (the one in the video) from Mobile Fun.

Samsung to Announce the Galaxy S5 at Unpacked February 24

The Android community has been patiently waiting official information on the Samsung Galaxy S5 and it looks like the time has come. The next generation of Samsung’s Galaxy flagship line of devices is expected to be announced February 24th at their Unpacked event in Barcelona, Spain. This event will come on the eve of Mobile World Congress based on the name “Unpacked 5”.

Samsung UNPACKED 2014

With all of the rumors surrounding the Galaxy S5 we are ready to see the actual verified specifications as well as form of the new GS5. Hopefully we see more than just a speed increase and larger screen and some native Qi charging capabilities would be nice since most other devices already have this feature. Samsung has always released their flagship devices via their own events each year around the same time that Apple makes their announcements to add a little competition as well as get Android users to all but ignore Apple products.

If you aren’t able to take the trip to Barcelona for the event you can check out Samsung’s YouTube channel and get a virtual view of the event wherever you are in the World. Samsung has mentioned on their flyer that event will be live on their YouTube channel. The event will start at 20:00 CET on Monday, February 24th.

Add us to your Google Plus circles to follow the event live as well. We will be talking about everything announced during the event and try to only hit on the key points as they are brought up. This will be for those of you that only want to follow the important announcements and avoid watching the entire event.

Samsung Galaxy S5 Predicted Specifications by KGI

Galaxy S5 Rumored SpecificationsKGI Research has predicted the Samsung Galaxy S5 specifications base on rumors that their will be two different models of the device released. One of the GS5’s will be a Global Standard version and the other a Prime Global version. Of course everything is just rumors floating about and a few leaks to verify some but should just the same be taken with a grain of salt. This being said the specs don’t seem to be that far off.

First we will start with the Prime version of the Galaxy S5 which of course is the Mac Daddy GS5 with its 32-bit Octa-core processor. Here is the list of specifications that have been predicted:

  • Exynos 5430 32-bit Octa-core processor
  • Qualcomm MDM9615 or Intel XMM 6360 Baseband
  • 5.2 inch WQHD AMOLED Display
  • 2,560 x 1,440 resolution at 565 PPI
  • 3GB LPDDR3 RAM
  • 2MP front and 16MP rear cameras
  • 3D Gesture Support
  • Fingerprint scanner
  • Plastic Casing
  • 2,850 mAh battery

Second is the Standard version of the Galaxy S5 which is likely the one that will go to all of the carriers like AT&T and Verizon. The Standard version has a bit more vague specs but nice just the same.

  • Qualcomm MSM 8974AC Quad-core or Exynos 5422 Octa-core processor
  • Intel XMM 6360 Baseband (if Exynos is the processor)
  • 5.2 inch FHD AMOLED Display
  • 1,920 x 1,080 resolution at 423 PPI
  • 2GB LPDDR3 RAM
  • 2MP front and 16MP rear cameras
  • 3D Gesture Support
  • Fingerprint scanner
  • Plastic Casing
  • 2,850 mAh battery

From looking at the specs it doesn’t seem that the difference will matter much. Some power users would find the extra GB of RAM useful although the average user may not even care or notice. The screen resolution difference seems almost pointless since its on such a small screen and if the devices aren’t side by side may not even be noticed by most users.

source: 9to5Google

How to Carrier Unlock The Samsung Galaxy S4 for Free

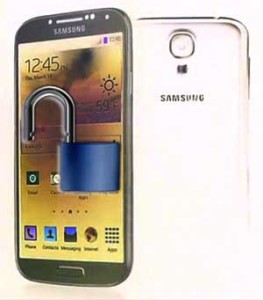
Free Carrier Unlock InstructionsIf your looking to move carriers and have a GSM phone you expect to be able to take out the old SIM card and put a new one in and keep going but carriers lock the devices so its not so easy to leave them. Here we decided to post the unlock instructions for the Samsung Galaxy S4 so that you can use the popular device with any GSM carrier. You paid for the phone so why shouldn’t you be able to take it with you to a new carrier?

The process of unlocking your Galaxy S4 to use on a different carrier is not as difficult as you would think and does NOT require rooting the phone to complete. You don’t even need to hold combinations of buttons and run through scary screens. I will note thought that you might want to backup anything on your phone you aren’t willing to lose. The process shouldn’t wipe your device although when making changes like this it can happen and better to be prepared than sad about losing something.

While this method seems to work flawlessly on the T-Mobile version of the GS4 we have had a few people let us know that it was successful on their AT&T Galaxy S4 as well so let us know if you do this to an AT&T version and the outcome.

UPDATE: It seems that this currently does not work on the AT&T Galaxy S4 as of the most current update to the device.  This being said I will look for AT&T method and add to this article when available.

How to Carrier Unlock the T-Mobile Galaxy S4 (SGH-M919)

  1. Go to phone dialer, and enter *#27663368378# to bring up the debug service menu.
  2. In “Service Mode” select option [1] UMTS
  3. In “UMTS MAIN MENU” select option [1] DEBUG SCREEN
  4. In “DEBUG SCREEN” select option [6] PHONE CONTROL
  5. In “PHONE CONTROL” select option [6] NETWORK LOCK
  6. In “NETWORK LOCK” select option [3] PERSO SHA256 OFF
  7. You should now see SHA256_ENABLED_FLAG[1] as an option select it
  8. You should now see MENU NOT EXIST PRESS BACK KEY Current Command is 116631
  9. Next press the menu button and select “Back”
  10. You should now see SHA256_ENABLED_FLAG[0] SHA256_OFF => Not Change
  11. Press the menu button again and select “Back”
  12. You should now be back at the “NETWORK LOCK” screen
  13. Press the menu button and select “Back”
  14. Now you should be back at the “PHONE CONTROL” screen
  15. Press the menu button and select “Back” again
  16. Now you should be back at the “DEBUG SCREEN” screen
  17. One more time press the menu button and select “Back”
  18. This should take you back to the “UMTS MAIN MENU” screen
  19. Select option [6] COMMON
  20. In “COMMON” screen select option [6] NV REBUILD
  21. Now you are in the “NV REBUILD” screen, you should see “Golden-Backup exist” “You can Restore Cal/NV”
  22. In “NV REBUILD” screen select option [4] Restore Back-up
  23. The button lights for menu and back should come on and your GS4 will auto reboot after a few seconds.

VIDEO AVAILABLE SHORTLY

In order to test success you will need to insert a new carriers SIM card and upon booting the device up you shouldn’t see a popup asking for an unlock code as it does when locked. If you have any issues with the process please feel free to let us know as well as anything we may have missed. You best bet is to watch the process in our video above and then run through the instructions that way you have an idea of what to expect.

Spigen Neo Hybrid Nexus 5 Case Review

The Google Nexus 5 is one of the most popular devices of 2013 and even still in early 2014 and with that comes a lot of accessories worth looking at. This time we grabbed a Spigen Neo Hybrid case for the Nexus 5 and found it to be a very thin form fitting case. While maybe not the most protective case for the Nexus 5 it does add some style to the device. Like many cases the Neo Hybrid case consists of two parts being a TPU back with a polycarbonate frame. Maybe not a protective case per say but it is a durable and stylish case.
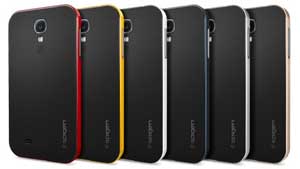
Spigen Neo Hybrid Case ReviewSpigen Neo Hybrid Nexus 5 Case Design
As we stated already the case consists of an inner layer that completely surrounds the device with a second part that is a thin plastic frame that surrounds the device and holds the case together. The surrounding piece has all of the cutouts for the device as well as hard buttons for the volume rocker and power so that you don’t need to worry about putting pressure on the rubber buttons that most cases have. The case fits very secure and can make it a bit harder to get your phone in and out of but that is due to a nice bevel and raised edges to hold the surrounding piece to the device. We do have to note that the larger TPU part of the case feels flimsy although once you put the entire case together it feels solid as you can see from the video below.

Something worth noting is that the case does allow for you to purchase additional polycarbonate surrounding pieces to change the color from your initial purchase to many other colors. Some of the colors available are Champagne Gold, Dante Red, Infinity White, Metal Slate, Reventon Yellow and Satin Silver. These shells are interchangeable to match your style adding a little positive design feature.

Spigen Neo Hybrid Nexus 5 Case Protection
Again we mentioned that this is not a case meant for people who drop their devices on a regular bases as it is a ver form fitting thin case. This being said it does have pretty good protection against small drops and protects against scratches since the entire device is covered besides the screen. The raises bevel allows you to place your Nexus 5 face down without worry about scratching the screen although we would recommend a screen protector when using the case.

Spigen Neo Hybrid Nexus 5 Case Installation
We added installation of the Neo Hybrid case because there is a proper way to install it without getting frustrated. If you try to put one piece on at a time you will curse ever buying it because the frame is made to fit snug against the Nexus 5. This being said all you need to do is put the two parts of the case together and then press the Nexus 5 into it starting at the top. You can see form the video review that its easy to do when the case is already together.

Conclusion If you follow us you know that Android Advice is partial to Spigen cases although this one is a very basic case for design and protection when it comes to protective cases. Even though it is in the protective case category we look at it more as a stylish case with protective qualities. This is a great case for those that normally don’t have a case and want a little added protection as well as those who like to customize their case colors periodically. The Spigen Neo Hybrid Case will set you back around $25-$30.

First Keyboard Case for the Samsung Galaxy Tab Pro / Note Pro 12.2

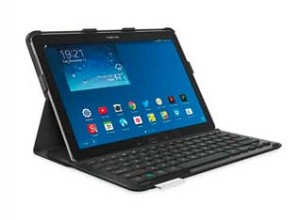
Galaxy Tab Pro / Note Pro 12.2 Keyboard CaseTablets have become a replacement for many laptop users and the first accessory that we look for is a keyboard of some kind. Gear Zap has put up a Logitech Pro Keyboard Case for the Galaxy Tab Pro and Note Pro 12.2 available for pre-order. We decided to take a moment and look through its features and design.
Logitech Pro Keyboard Case for the Galaxy Tab Pro and Note Pro 12.2 Features

  • Slim Design – Full sized keyboard to allow you to type the same way you would on a laptop with a light weight and case that offers some protection for your tablet.
  • Protective design – Protects both the front and back of the device to allow protection against drops and scratches.
  • Dual-Stand View – You can open up the case and use it as a laptop by setting it in the keyboard and lay it flat as well to hide the keyboard and use it as a tablet.
  • Long battery life – Promises up to three months of battery life from each charge which is charged by a micro USB cable.
  • Secure lock system – lightweight clips have been added to the corners of the case to hold your tablet in place securely.

Some of the things we notice by looking at the images available for the device are the clips are not only on the corners to hold the tablet in place but also along the top. Also you can see that there is a power switch on the keyboard for power and not just a button. The keyboard seems to be about the same thickness as the tablet as well although this still makes for a very thin keyboard case.

We are looking forward to getting out hands on one of these cases to demo although they aren’t yet available to us yet. When we do get one we will do a video review so that you can see the benefits and/or drawbacks the Note Pro 12.2 case has to offer. While this looks to be a very nice accessory for your Galaxy Tab Pro or Note Pro 12.2 it will set you back about $180 which seems a bit high but for the first of its kind it is expected.

Where to buy the Galaxy Tab Pro / Note Pro 12.2 Keyboard case
http://www.gearzap.com/logitech-pro-keyboard-case-for-galaxy-tab-pro-note-pro-12-2.html

Review: Qi Wireless Charging Pad and Stand

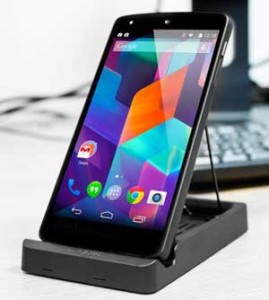
Qi Wireless Charging Pad and StandThere have been a lot of Qi wireless charging solutions show their faces over the past year and one of them is the Qi Wireless Charging Pad and Stand. Most of the Qi Charging pads are just that, a pad that you have to lay your phone on. Even then there are many chargers out there that hold the phone but most tend to be larger and aren’t as easy to move around or take with you on the go. The Qi Wireless Charging Pad and stand makes it easy to carry it around by doubling as a pad or stand depending on how you need to use it. See more information about this accessory below.

Qi Wireless Charging Pad and Stand Design
As we mentioned already the Wireless charging pad can be lifted from the base to allow your phone to charge and be seen. The stand and pad are not much larger than your phone allowing it to be easily moved around. The entire device is very lightweight and still sits sturdy on a flat surface. It comes with the Pad/Stand which is one piece and is held up when using as a stand by a thin metal U shaped leg. This leg does seem a little cheap although you will be setting a phone on it not a brick so you should never have an issue with its quality. The only color we have seen is black although it does have a clean look and will not look out of place on any desk.

Qi Wireless Charging Pad and Stand Performance
The charging pad is the true bit to be reviewed when it comes to performance and it seems to charge as quickly as any other inductive charger we have. We have seen mention of the new Droid Maxx not charging in normal portrait mode although when turning the device upside down it charges fine. Devices that we have tried on the charging pad in its upright form are the Samsung Galaxy S4 (with Qi adapter), Galaxy Note 3 (with Qi adapter) and the Google Nexus 5. All three of these devices can sit in an upright position and charge just fine. Of course as a charging pad you can place any Qi compatible device on it without issue.

What to keep in Mind before Purchase
The first thing we noticed is that the Qi Charging Pad and Stand came with a EU adapter and no US adapter. All this means is that you will either need to get your hands on a US adapter or a different plug with the same power output. Second there are many devices that are listed as compatible with the Qi Stand although some of them will require a Qi adapter pad that you can place behind the battery to charge wirelessly.

Conclusion
The Qi Wireless Charging Pad and stand has been a great addition to our wireless charging arsenal and works very well for what it is intended for. There have only been a few quirks like the EU adapter and such but those are rather easy things to fix with an in-expensive adapter. If you have any questions about the Qi pad and stand please feel free to ask away.