Android is the US Smartphone OS Leader

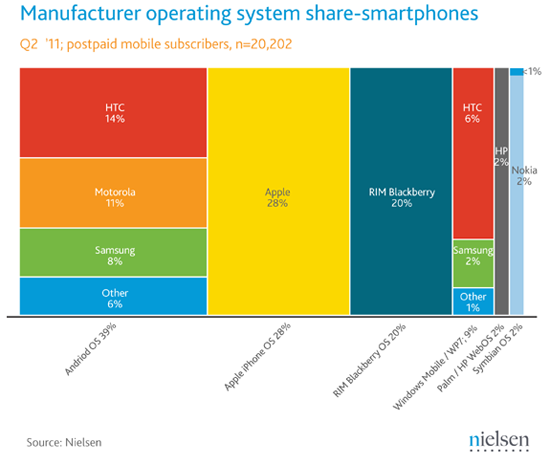
A recent post on Nielson’s official blog places Android as the top smartphone operating system in the US in Q2 2011. Android takes 39% of the market share with HTC being the top manufacturer responsible for 14% of it.
Manufacturer Operating System Smartphone Share
Smartphone OS and their Share of the Market:

  1. Google’s Android OS at 39%
  2. Apple’s iOS at 28%
  3. RIM Blackberry at 20%
  4. Windows Mobile OS at 9%
  5. Palm and Web OS at 2%
  6. Symbian OS at 2%

Top Android Manufacturers and their Shares According to Nielson:

  1. HTC Corporation with 14% of smartphone shares using Android OS
  2. Motorola with 11% of smartphone shares using Android OS
  3. Samsung with 8% of smartphone shares using Android OS
  4. All other manufacturers together make up the remaining 6%

Top overall Smartphone Manufacturers:

  1. 28% – Apple
  2. 20% – HTC Corporation
  3. 20% – Blackberry
  4. 11% – Motorola
  5. 10% – Samsung
  6. 2% – Hewlett Packard
  7. 2% – Nokia
  8. All others combined make up the last 7%

Before looking at this breakdown we would have assumed that Samsung was a little higher on the list although we knew HTC would be near if not at the top.

YouMail Stopped Working After Gingerbread Update (FIX)

Many Youmail users have noticed that their greeting has stopped working after updating their phones to Gingerbread. While we have no idea why this happens there is a way to get everything working again.

Problem:
After upgrading your Android phone to Gingerbread Youmail’s greeting stops working. Also there are a few minor bugs within the app itself.

Fix for Youmail after Gingerbread update:

  1. Download the newest Youmail APK (Download Link)
  2. Remove Youmail from your phone (simple uninstall is fine)
  3. Install the newly downloaded APK
  4. Open Youmail and tap your phones menu button
  5. Go to Preferences -> Greetings -> Default Greetings
  6. uncheck smart Greeting (if checked)
  7. Each of the 3 places it says Greeting change the greeting to something new
  8. Youmail should be working fine now

After you have followed the steps above you should be able to test it by calling yourself with a different phone. If everything seems to be ok then you can go back in to the greetings and change it back to whatever you had it set at previously.

New Android Market being Pushed to Devices

New Google Android Market

A few weeks ago Google announced that there would be an Android Market overhaul and got us all excited. So we have been patiently waiting for the update to come to our devices. Finally the day has came that the Market is getting pushed to your device in most cases without your knowledge.

If you have a virus scanner installed you will notice after going to the old Google Market and closing it that any scanner you have will say “App Install Detected and scan it. This is ok, its just Google updating your market behind the scenes.  If you don’t see it install then you will notice when opening the market it will look completely different (in a good way I think).

The first thing that you will notice in the new market is the tiled user interface which seems to be the way apps and websites alike are heading lately.  Second you will notice a few new areas the old market was lacking.  There will be a Book section, Movie rental section, top charts and editors picks.  Even when you search there will be a breakdown instead of the cluster of app types you used to see.

Some of the new features of the Google Android Market:

  • Tile designed UI
  • Books purchases
  • Movie rentals
  • Top Charts
  • Editors’ picks

The first time you open the market you may notice its still the old one but you will just notice that your market has changed after closing it and re-opening it once. We aren’t sure why the updates happen this way but it seems that this is always the case with the market updates.  Let us know what you think of the new market and if its easier for you or you just want the old one back.  Of course we are all slightly against change to some level I think this is a change we can all accept.

How to Use Android Voice Commands (tutorial)

Android Voice CommandsMany Android users don’t realize that they can perform almost any action on their device using voice commands. The Android OS has Android Voice Actions built in to save you time typing. These Voice Commands are especially useful when driving and texting to avoid tickets and accidents.

Purpose of this Tutorial:
To give you an understanding of how to use Android’s voice commands within different functions of your device. Explain common voice commands that you will use on a regular basis once understood.

You will most prominently see the voice commands accessible through your Google Search Widget. If you have removed this widget we recommend putting it somewhere to access it easily.

Basic Use of the Voice Commands:
When you tap on the microphone image on the right side of the widget you will get a popup that says “Speak Now”. If you wait too long to start talking it will change to either “No Speech Heard” or “No Match Found”. If this happens just tap “Speak Again”.

Always remember to start the voice commands recognition to tap the microphone icon on the top right of the Google Search Widget.

Using Voice Commands to Search on Google:
Searching for Keywords, Just start saying the search phrase that you are looking for and after completed it will open your browser and search Google for the keywords.
GO TO WEB ADDRESS … i.e. “Go to google.com” will go to Google.com in your web browser.
DEFINE WORD … i.e. “Define Android” will open your browser and give you the words definition.

Using Voice Commands to Call Someone:
CALL PHONE NUMBER OR NAME MOBILE … i.e. “Call Brandon Orndorff Mobile” or “Call 5555555555”. This will call either your contact stored under Brandon Orndorff’s mobile number or the phone number 5555555555 respectively.

Using Voice Commands to find Nearby Places:
MAP PLACE … i.e. “Map Restaurants”. This will bring up a map of all of the nearby restaurants.

Using Voice Commands for Navigation (GPS):
NAVIGATE TO PLACE OR ADDRESS … i.e. “navigate to 7481 Android lane Denver north carolina 28037” or “navigate to Charlotte International Airport”. This will start up your navigation and give you directions to either the address or location provided respectively.

Using Voice Commands to send Text Messages:
SEND TEXT TO NAME OR PHONE NUMBER … i.e. “Send text to Brandon Orndorff I’m on my way home” or “Send text to 5555555555 I’m on my way home”. This will send the message “I’m on my way home to” Brandon Orndorff or the number respectively.

Using Voice Commands to Play Music:
PLAY SONG NAME i.e. “Play What I Got”. This will play the song “What I Got” assuming you have this song in your music library on the device.

There are many other uses for Voice Commands although these would be the most common. You will also notice that the microphone icon will be found throughout your device and within other apps. This microphone can be used in the same way as it is in the widget. Most commonly you will see it on your keyboard when it pops up.
Remove Android’s Lock Screen

Many people have requested a way to remove the lock screen on their Android phones.  There are many phones that have less than ideal lock screens and they are more of an annoyance than an actual security feature. Its not as difficult as most might think to remove the lock screen even though in most cases there is no way to do it within Android’s setting. There are a few apps that work well on the Google Android Market at removing the lock screen.

The “No Lock” app allows you to remove the slide unlock gesture and replace it with either a button or nothing at all. If you trust your pocket to not pop the power button and unlock it for you this app will do the trick.  We tried the app out and have to say that we never accidentally made any phone calls although you will need to be careful not to touch the screen when pulling it out of your pocket or you may run an app on accident.


Use the QR Code below to Download No Lock from the Google Market.

No Lock for Android QR Code


Keep in mind that this app does not work on all phones but can’t hurt to try it on your device.  Those devices that the app does not work on will just make no change to the device so there is no negative to trying it even if your not sure about its compatibility. Let us know what you think of the app and if it works with your device.  I’m sure that others interested in using the app would like to know if you have already tried it and if it works or not on your specific device.

How to Root the Toshiba Thrive

Toshiba ThriveIf you have a Toshiba Thrive you are in luck, it has been rooted. These instructions aren’t completely cleaned up but it has been tested on two Thrive’s by the developer.

These instructions are meant for users with an intermediate knowledge of Android SDK, Fastboot and the ClockworkMOD.  These root instructions are provided by us but you use them at your own risk.  Please keep in mind that we are in no way responsible for any modifications you try on your device.

You need to have the Android SDK and Toshiba Thrive drivers already on your computer.  Also you must know how to use Fastboot.

Root Instructions for the Toshiba Thrive:

  1. Download ClockworkMod Recovery (Download Link)
  2. Download modified Boot.img to make system read-write (Download Link)
  3. Place the 2 files into your android-sdk/tools folder
  4. If you don’t have AdbWinUSB.dll and AdbWinAPI.dll copy those from the platform-tools folder as well
  5. Download update.zip and place it on your SDcard (Download Link)
  6. Reboot your Thrive into its Bootloader (reboot, hold power up +power same time)
  7. When you see black screen with 3 icons navigate to usb-icon and hit power to select it
  8. flash custom boot image using fastboot “fastboot flash boot Thrive-SystemUnlocker-Boot.img”
  9. flash ClockworkMod recovery “fastboot flash recovery recovery.img”
  10. then type “fastboot reboot”
  11. Press and hold volume up while rebooting
  12. When back at three icons select ClockworkMod Recovery (middle icon)
  13. Navigate to mounting submenu … mount / system …. mount / sdcard
  14. Navigate back to main menu and choose install zip from sdcard
  15. select update.zip and let it recover
  16. Reboot your Thrive
  17. Install Superuser from the Market

Improve Battery Life on your Android Device

Improve Android Battery PowerThere are many things that may be cool on the Android OS that drain battery very fast. To improve your devices battery life you can do a few simple things that will go along way.

Steps to Improve battery life on Android Devices:

  1. While live wallpapers are fun and visually appealing they can be a serious drain on battery. Choosing a wallpaper that is static will decrease processor usage and memory so avoid using them if possible.
  2. Be sure that your screen timeout is set below 3 minutes if you can handle it. In most cases the display will be a serious draw of battery power.
  3. Turn off your cameras flash when not needed. The flash is generally not needed all the time when snapping pictures since most people don’t take pictures in the dark. If you don’t use the camera much then this may not matter, but for those of you that love taking pictures the flash will draw a lot of power.
  4. Turn off your GPS when not using Google Maps or other location based services. Having this pinging all the time is by far a huge battery sucker. Also when at home or anywhere else that has Wi-Fi use that instead of 3G.
  5. Vibrate uses battery more than needed. Turning this off will remove feedback you feel when typing but will improve battery life slightly. This isn’t going to be an important source of saved power but will help a bit.

Flash ASUS Transformer back to Stock 3.1

We have had a few requests from users that have had issues with their Transformers and needed to flash back to the stock ROM. Below are the Instructions to Flash the Transformer back to stock ROM whther you have bricked it or just want to unroot it.

The US version below will give you build HMJ37.US_epad-8.4.4.5-20110527 and the WW version below will give you build HMJ7.WW_epad-8.4.4.5-20110527.

Flash ASUS Transformer back to stock 3.1:

  1. Download the Stock ROM (US version) (WW Version)
  2. Unzip the package to a location you can access easily
  3. Enter APX Mode (Volume up and hold the power button at the same time)
  4. Connect the Transformer to your PC
  5. Run Download.bat
  6. Congrats you are back to a stock Transformer!

Any of you that have issues with this method or are unsuccessful please let us know so that we can try to update the instructions to make them easier to follow.

Backup your Contacts before Updating to Gingerbread!

We have noticed a lot of people mentioning that their contacts disappeared after updating to Gingerbread. The most recent was with the Atirx 4G update to Gingerbread. Those of you who have lost your contacts we hate it for you and wish there was something we could do.

What is the issue?
After updating your phone to Gingerbread there is no longer an internal phone storage for contacts. You know have to use a 3rd party cloud service. Some of you may feel like there are so many services specific to each manufacturer, my thoughts are use your gmail account since you need it for the Android device anyway to use the market and such.

What to do before updating to Gingerbread?
Make sure that you have backed up all of your phones internal contacts to your Google contacts. By doing this you ensure that they will be available after the update so that you don’t just realize after the update that they are all gone.

What to do after Gingerbread update?
To ensure that all of your contacts are always created in your Google contacts through your gmail account and you have a backup. Go to your contacts app, tap menu, “more” and then “settings”. Now tap “Contact Storage” and select “Google” and check “Remember this choice”. Now all of your contact when created will backup to your gmail’s contacts.

For those of you who already updated before reading this, you should still follow what to do after Gingerbread update to be sure you never lose a contact again.

How to Root the Atrix 4G after Gingerbread Update

Updated Root Method for the Motorola Atrix 4G

After updating your Motorola Atrix 4G you will lose root access. Some of you may not care because you only had it rooted for sideloading. For the others if you want to root your Motorola Atrix 4G after updating to Gingerbread this is how you do it.

Keep in mind that when typing in the commands during the rooting process you will leave out the quotes.

Instructions to root Atrix 4G running Gingerbread:

  1. Download and Extract Fastboot Files to your C: drive (Download Link)
  2. Connect your phone to the computer via USB
  3. Put your phone in fastboot mode (restart phone holding volume down button)
  4. Open a command prompt and navigate to C:/moto-fastboot-win32
  5. type “moto-fastboot.exe flash preinstall preinstall.img” press enter
  6. type “moto-fastboot.exe reboot” press enter
  7. Your phone should reboot, wait for it to come back up
  8. type “adb shell” press enter (to restart the shell)
  9. type “/preinstall/dosu” press enter
  10. If step 10 fails type “/reinstall/su” instead and hit enter
  11. type “/bin/mount -o remount,rw /system” press enter
  12. type “cp /preinstall/su /system/bin/” press enter
  13. type “chmod 6755 /system/bin/su” press enter
  14. type “PATH=/system/bin:$PATH pm install /preinstall/Superuser.apk” press enter
  15. Reboot your phone
  16. Congrats you now have a rooted Atrix running Gingerbread.

Those of you that use this root method for your Atrix running Gingerbread please let us know any issues you run into. We dont foresee any issues, nor have we heard of any at this point although we would like to hear your experiences.